Endless Possibilities

Today was an amazing experience in my 3d printing journey.

We have this sink in our bathroom without a drain stopper. I tried to buy one but the sink is old and fickle and none ever worked. It has a narrow diameter and needed to be longer than any I could find……Challenge Accepted.

My goal today was to design and print a replacement….ready….GO!
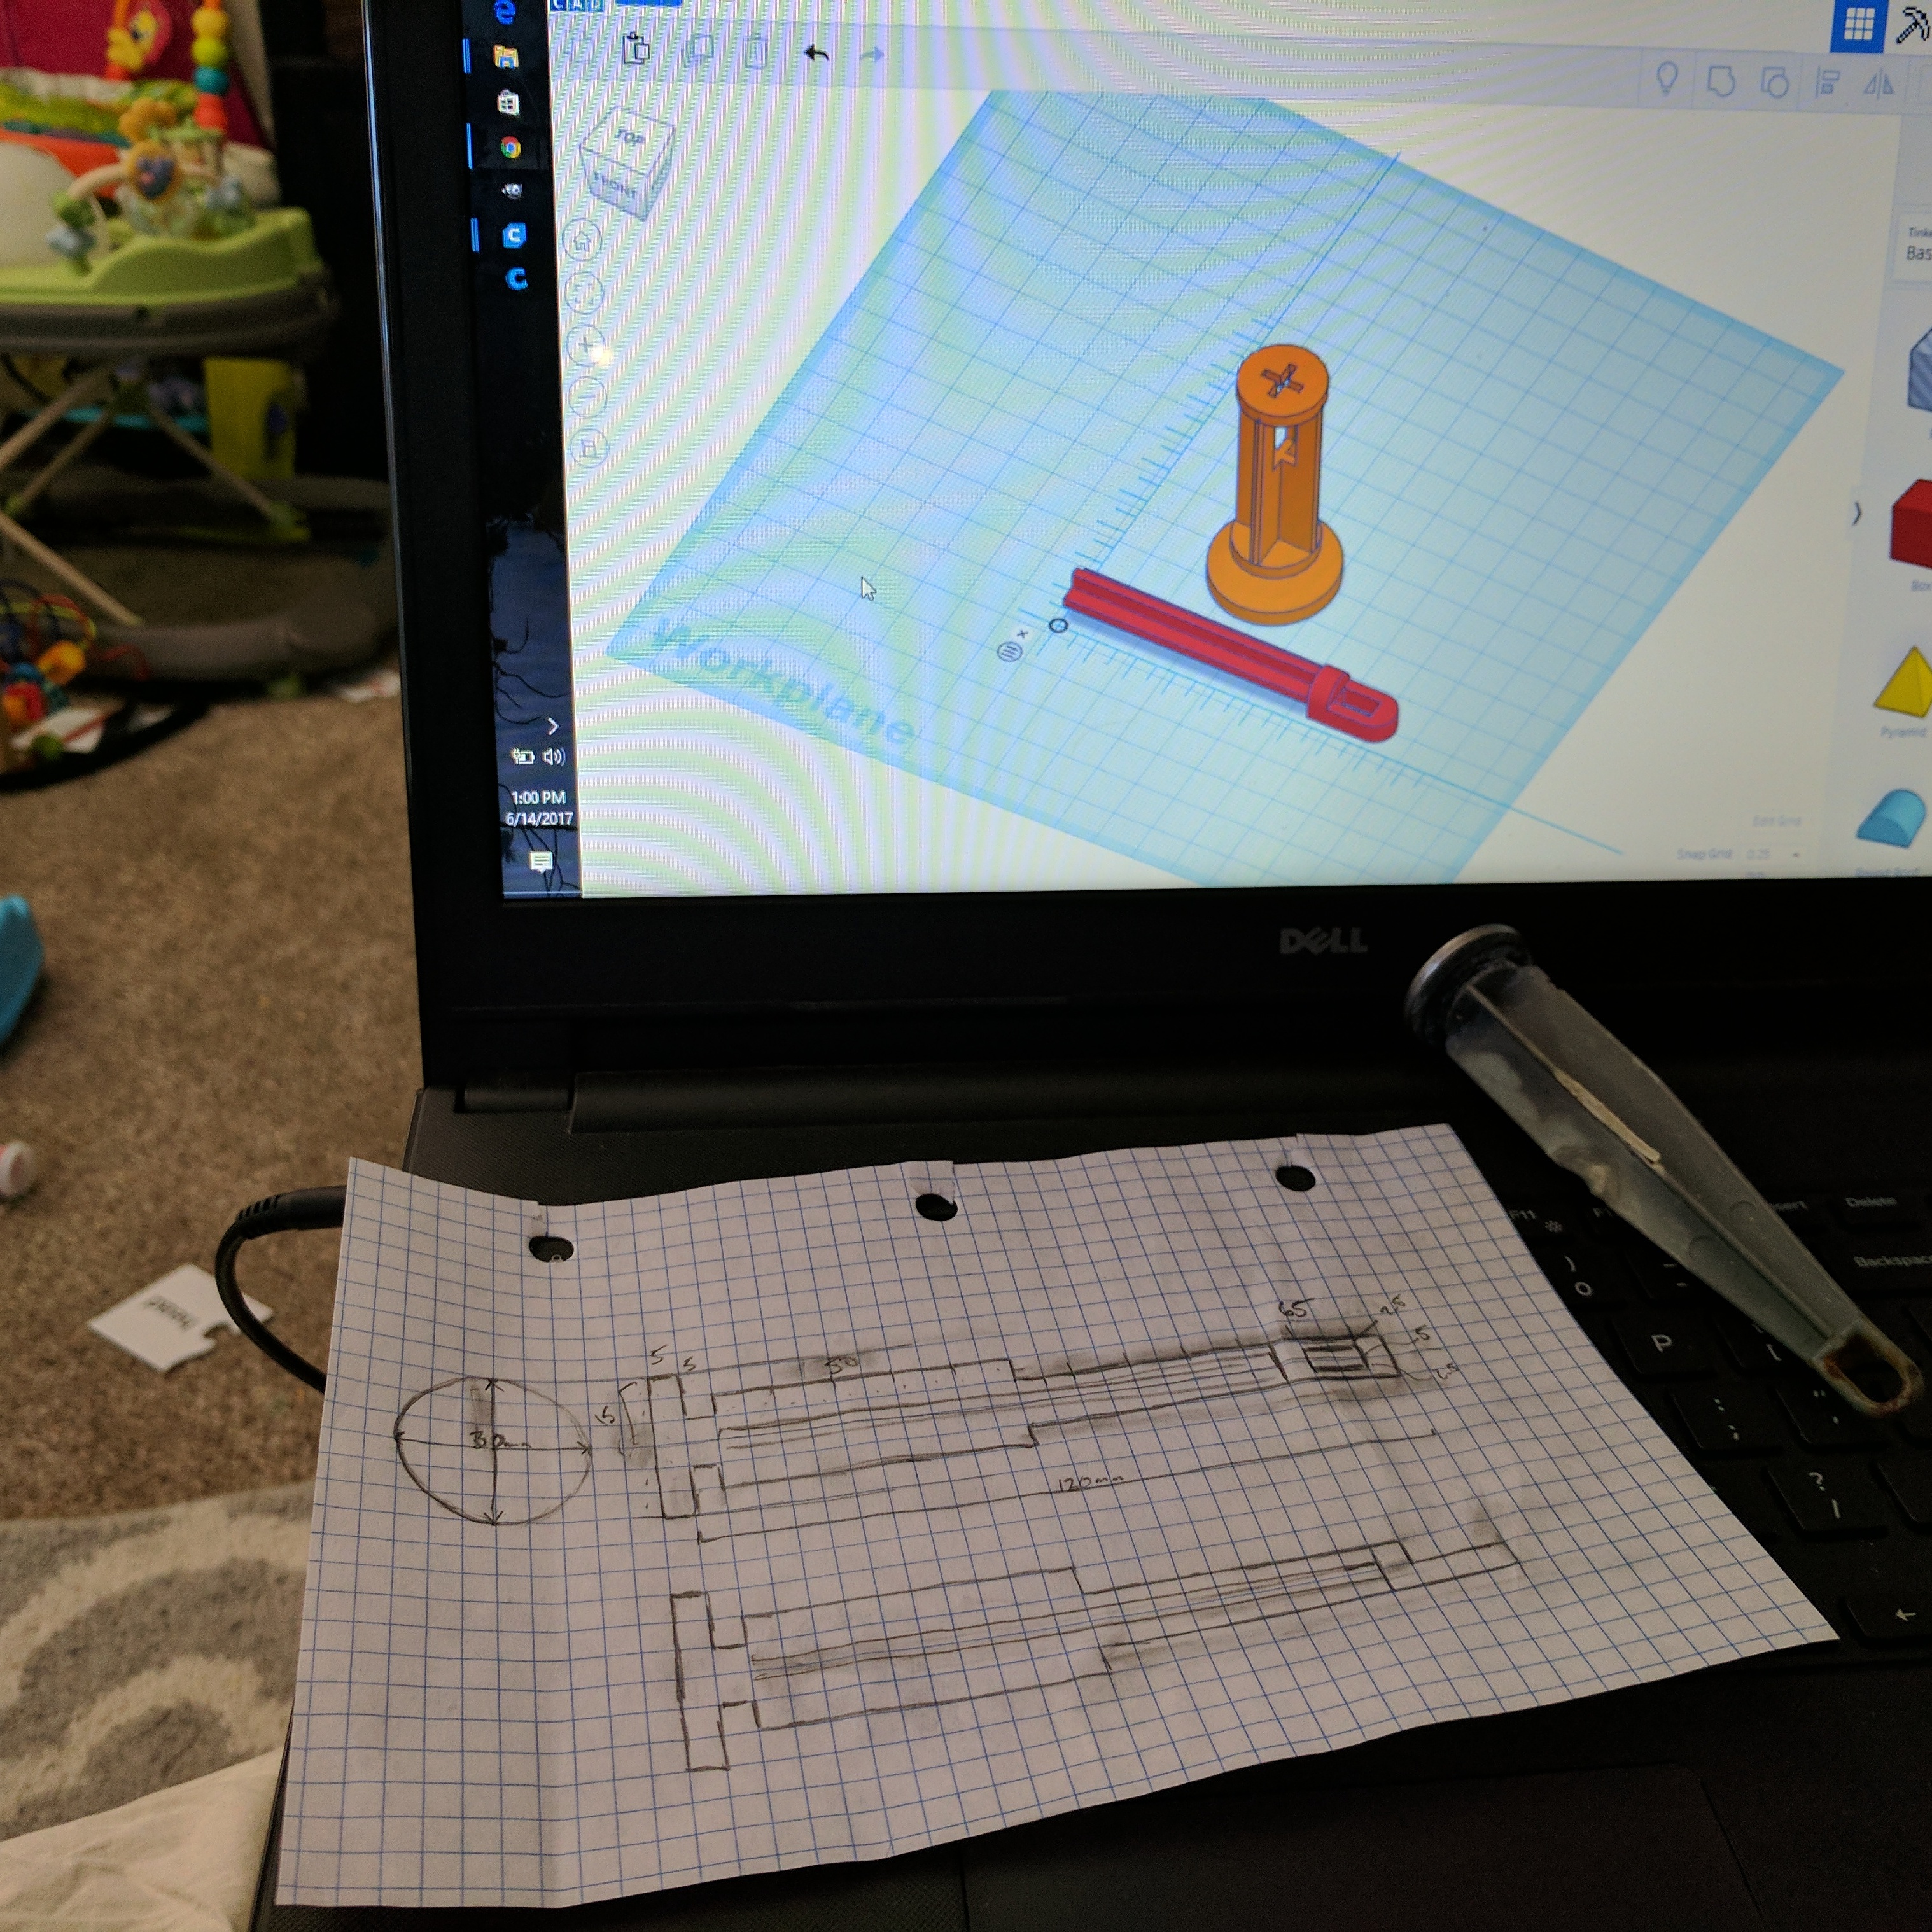
BLUE PRINTING

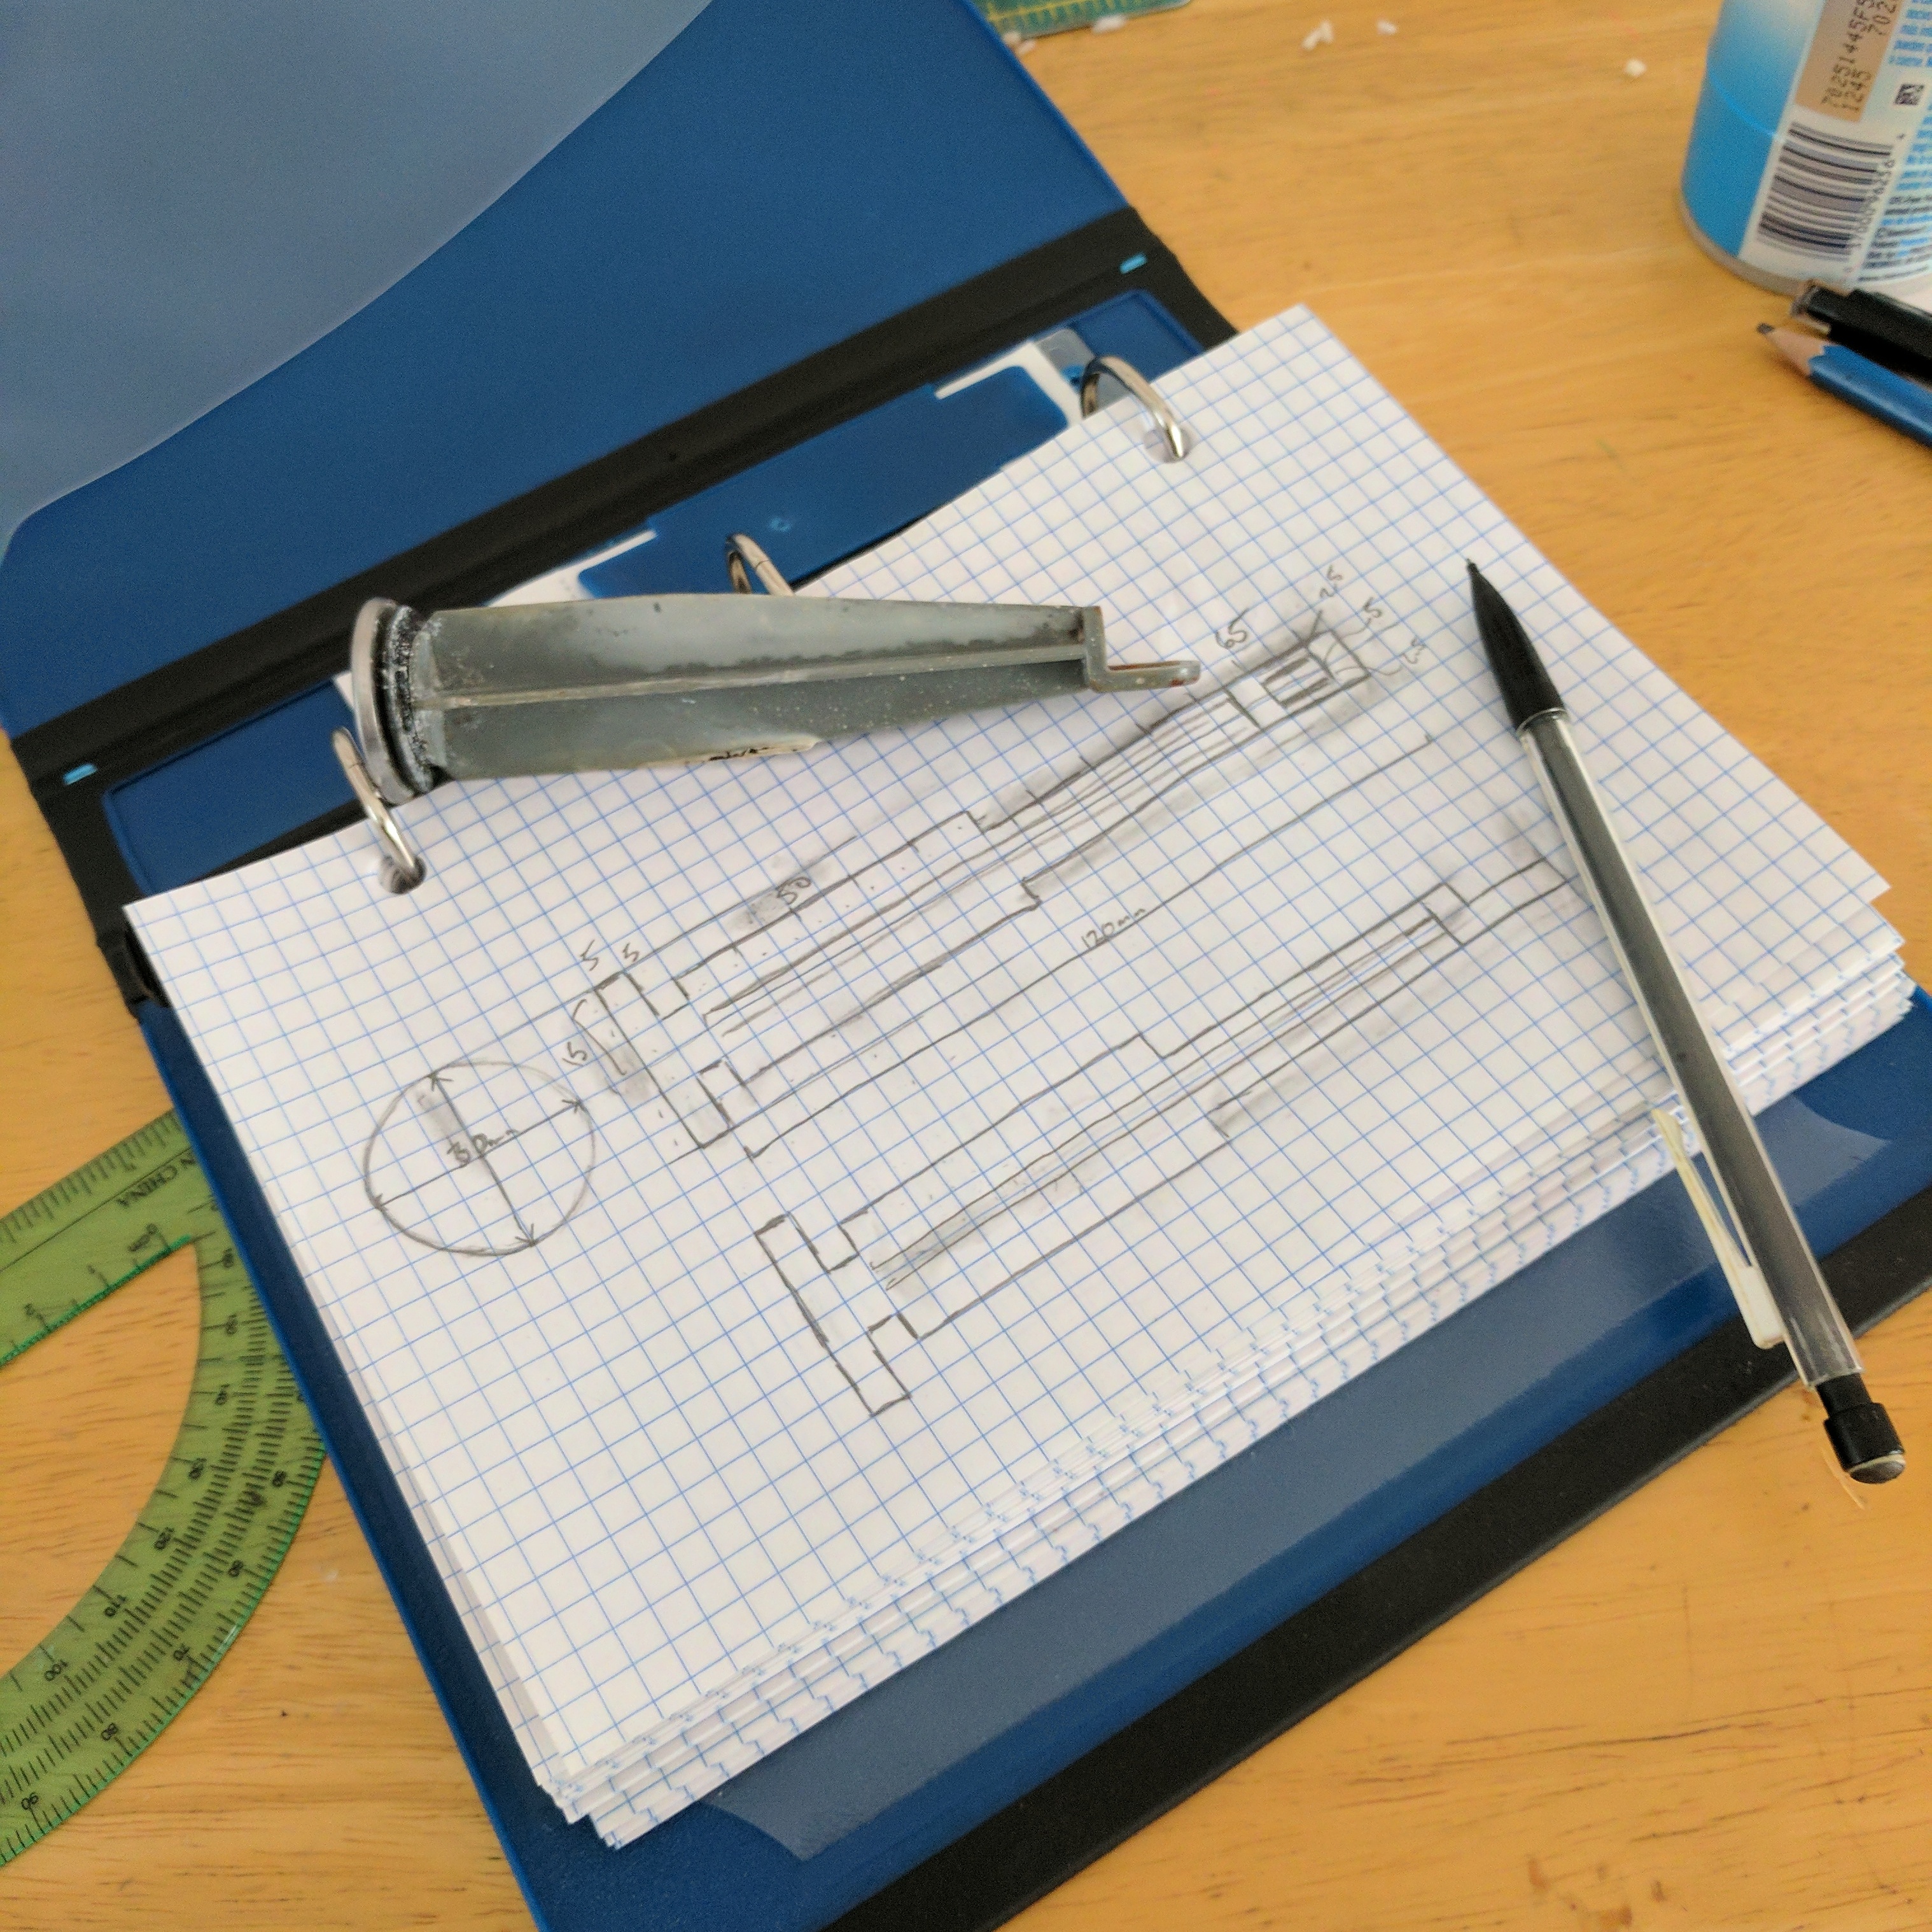
Now, we have another similar sink that does have a stopper in place, so I removed it and started sketching up a blue print with measurements.

MODELING

I then loaded up Tinkercad and started forming my design. I’m still getting used to Tinkercad’s layout and tools as well as learning how to make them work in my favor. 😀

I split the model I to two pieces because I was a little hesitant on if I could build it so tall. It was fun figuring out a way to connect the two pieces together.

PRINTING

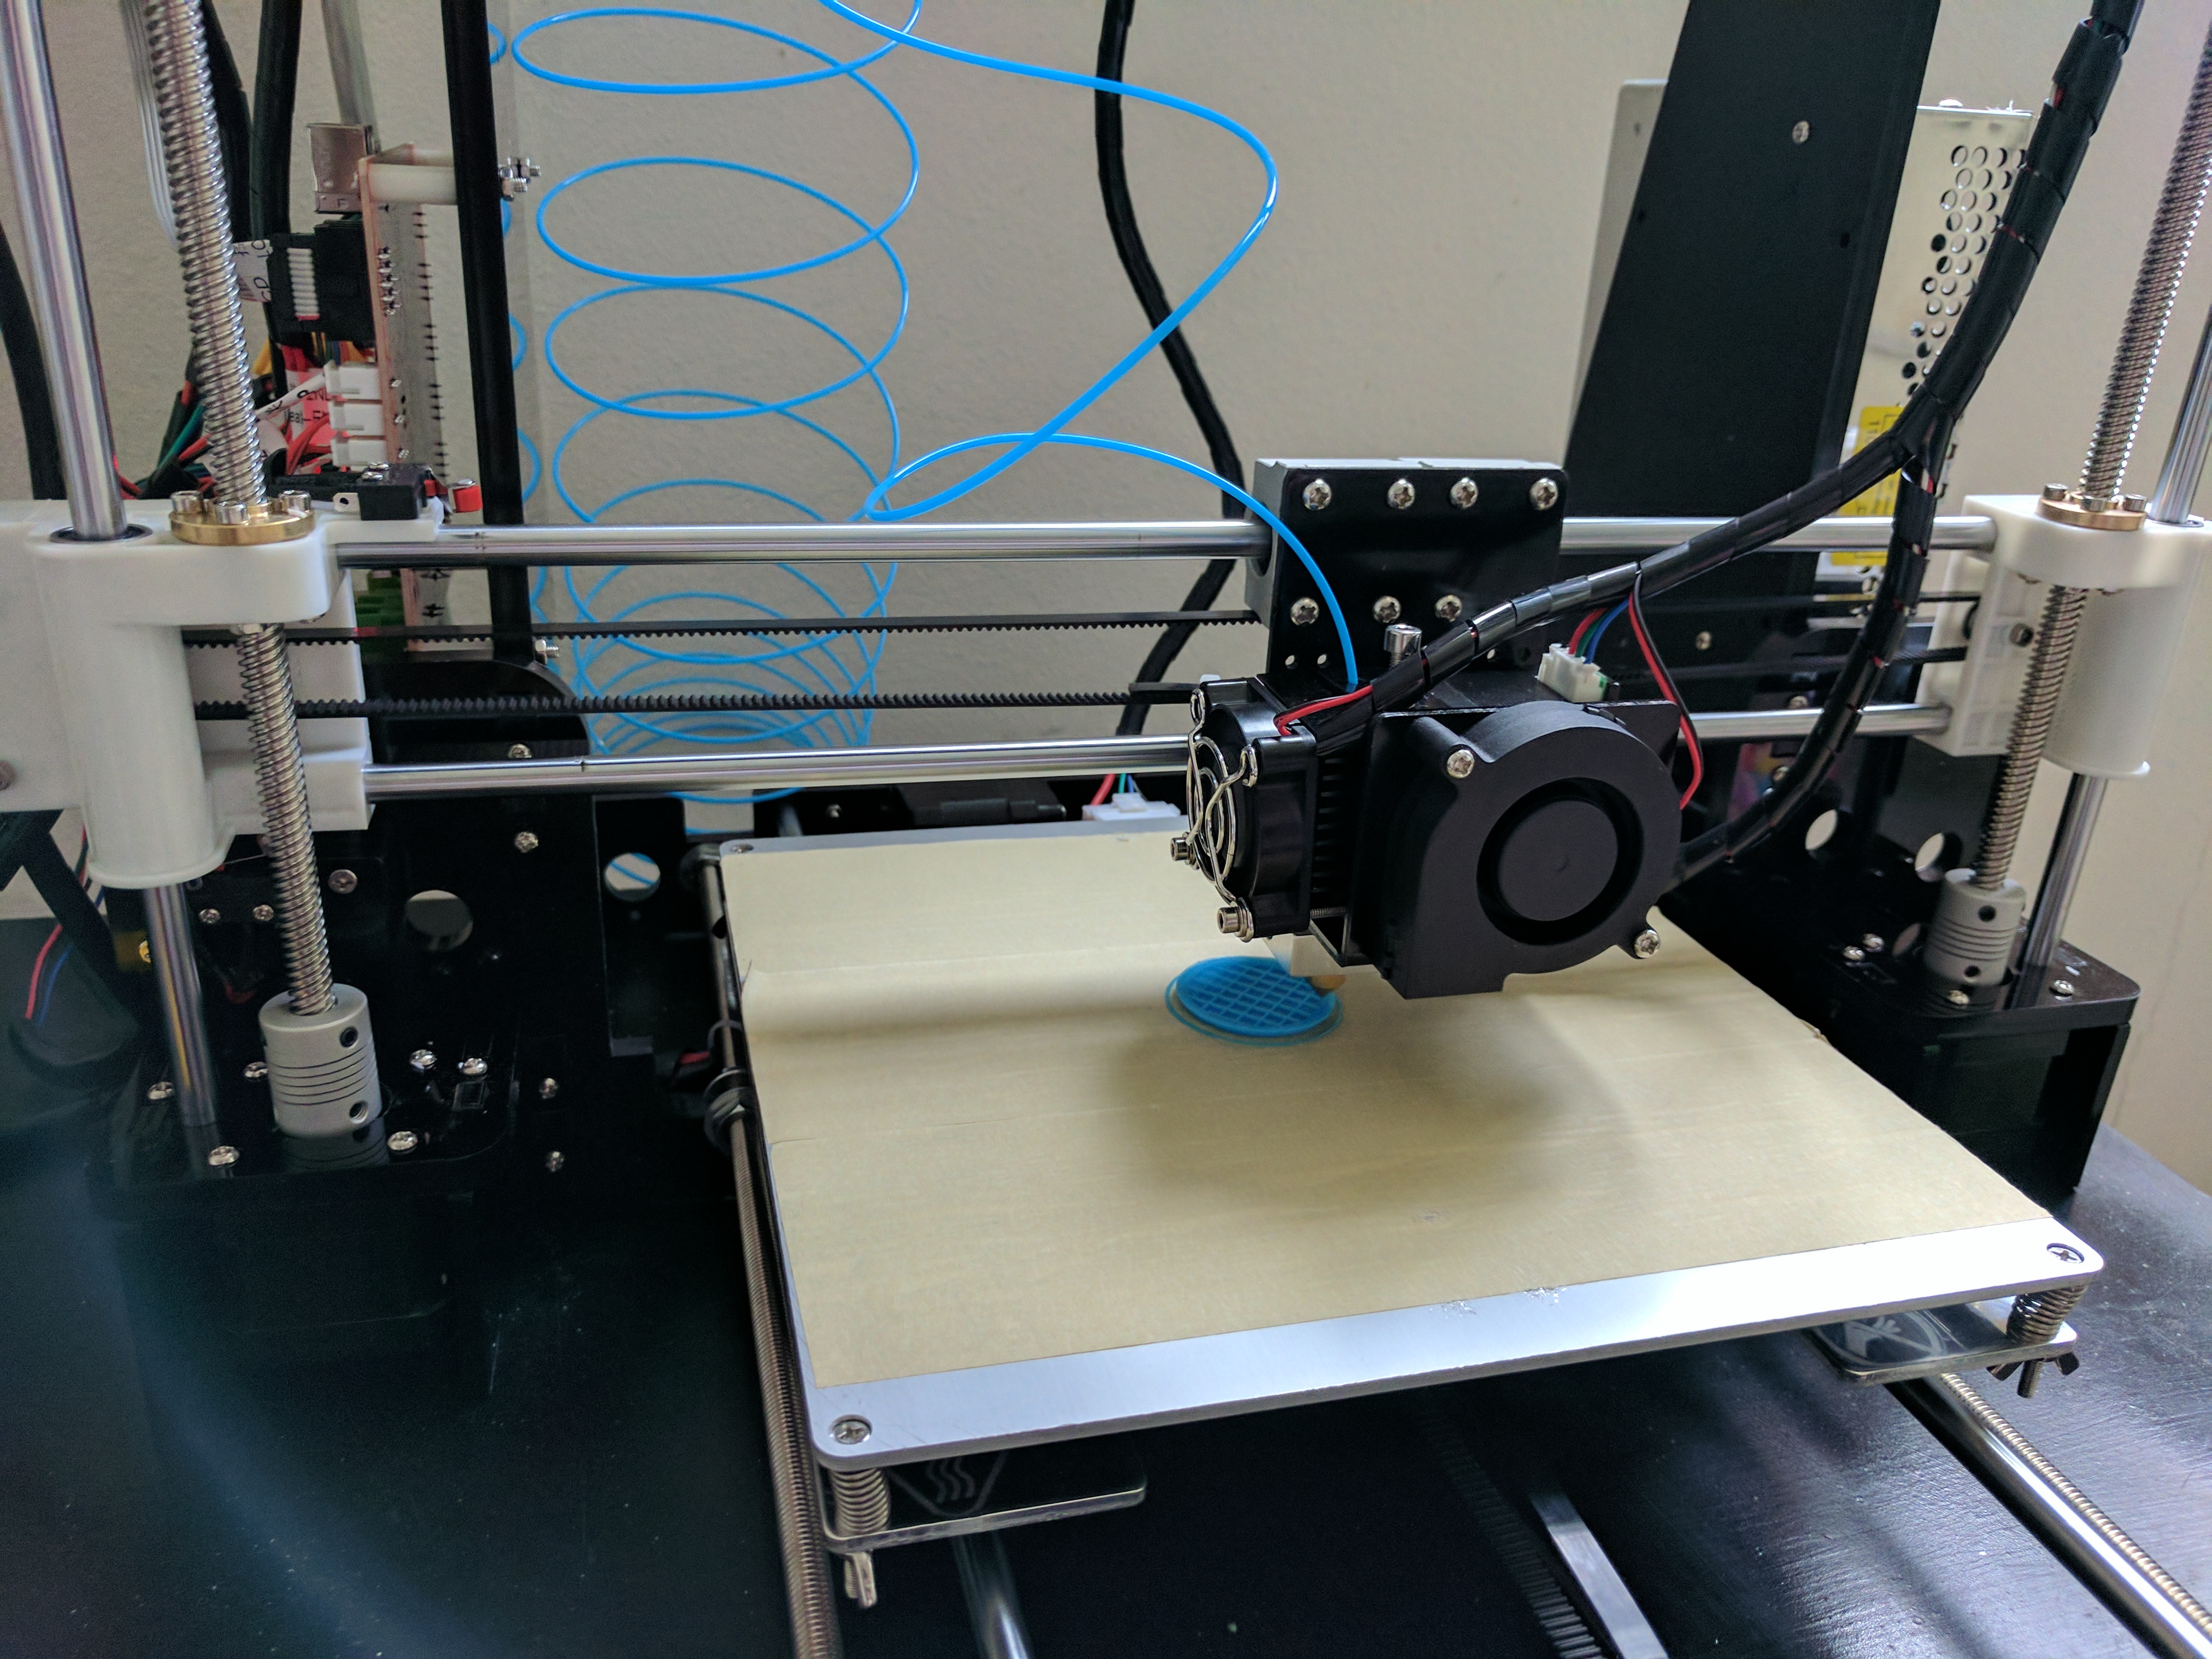
I tried a new setting for the first time. I printed the pieces on a raft to help with adhesion. And though a little problem with overhang, it printed!!!

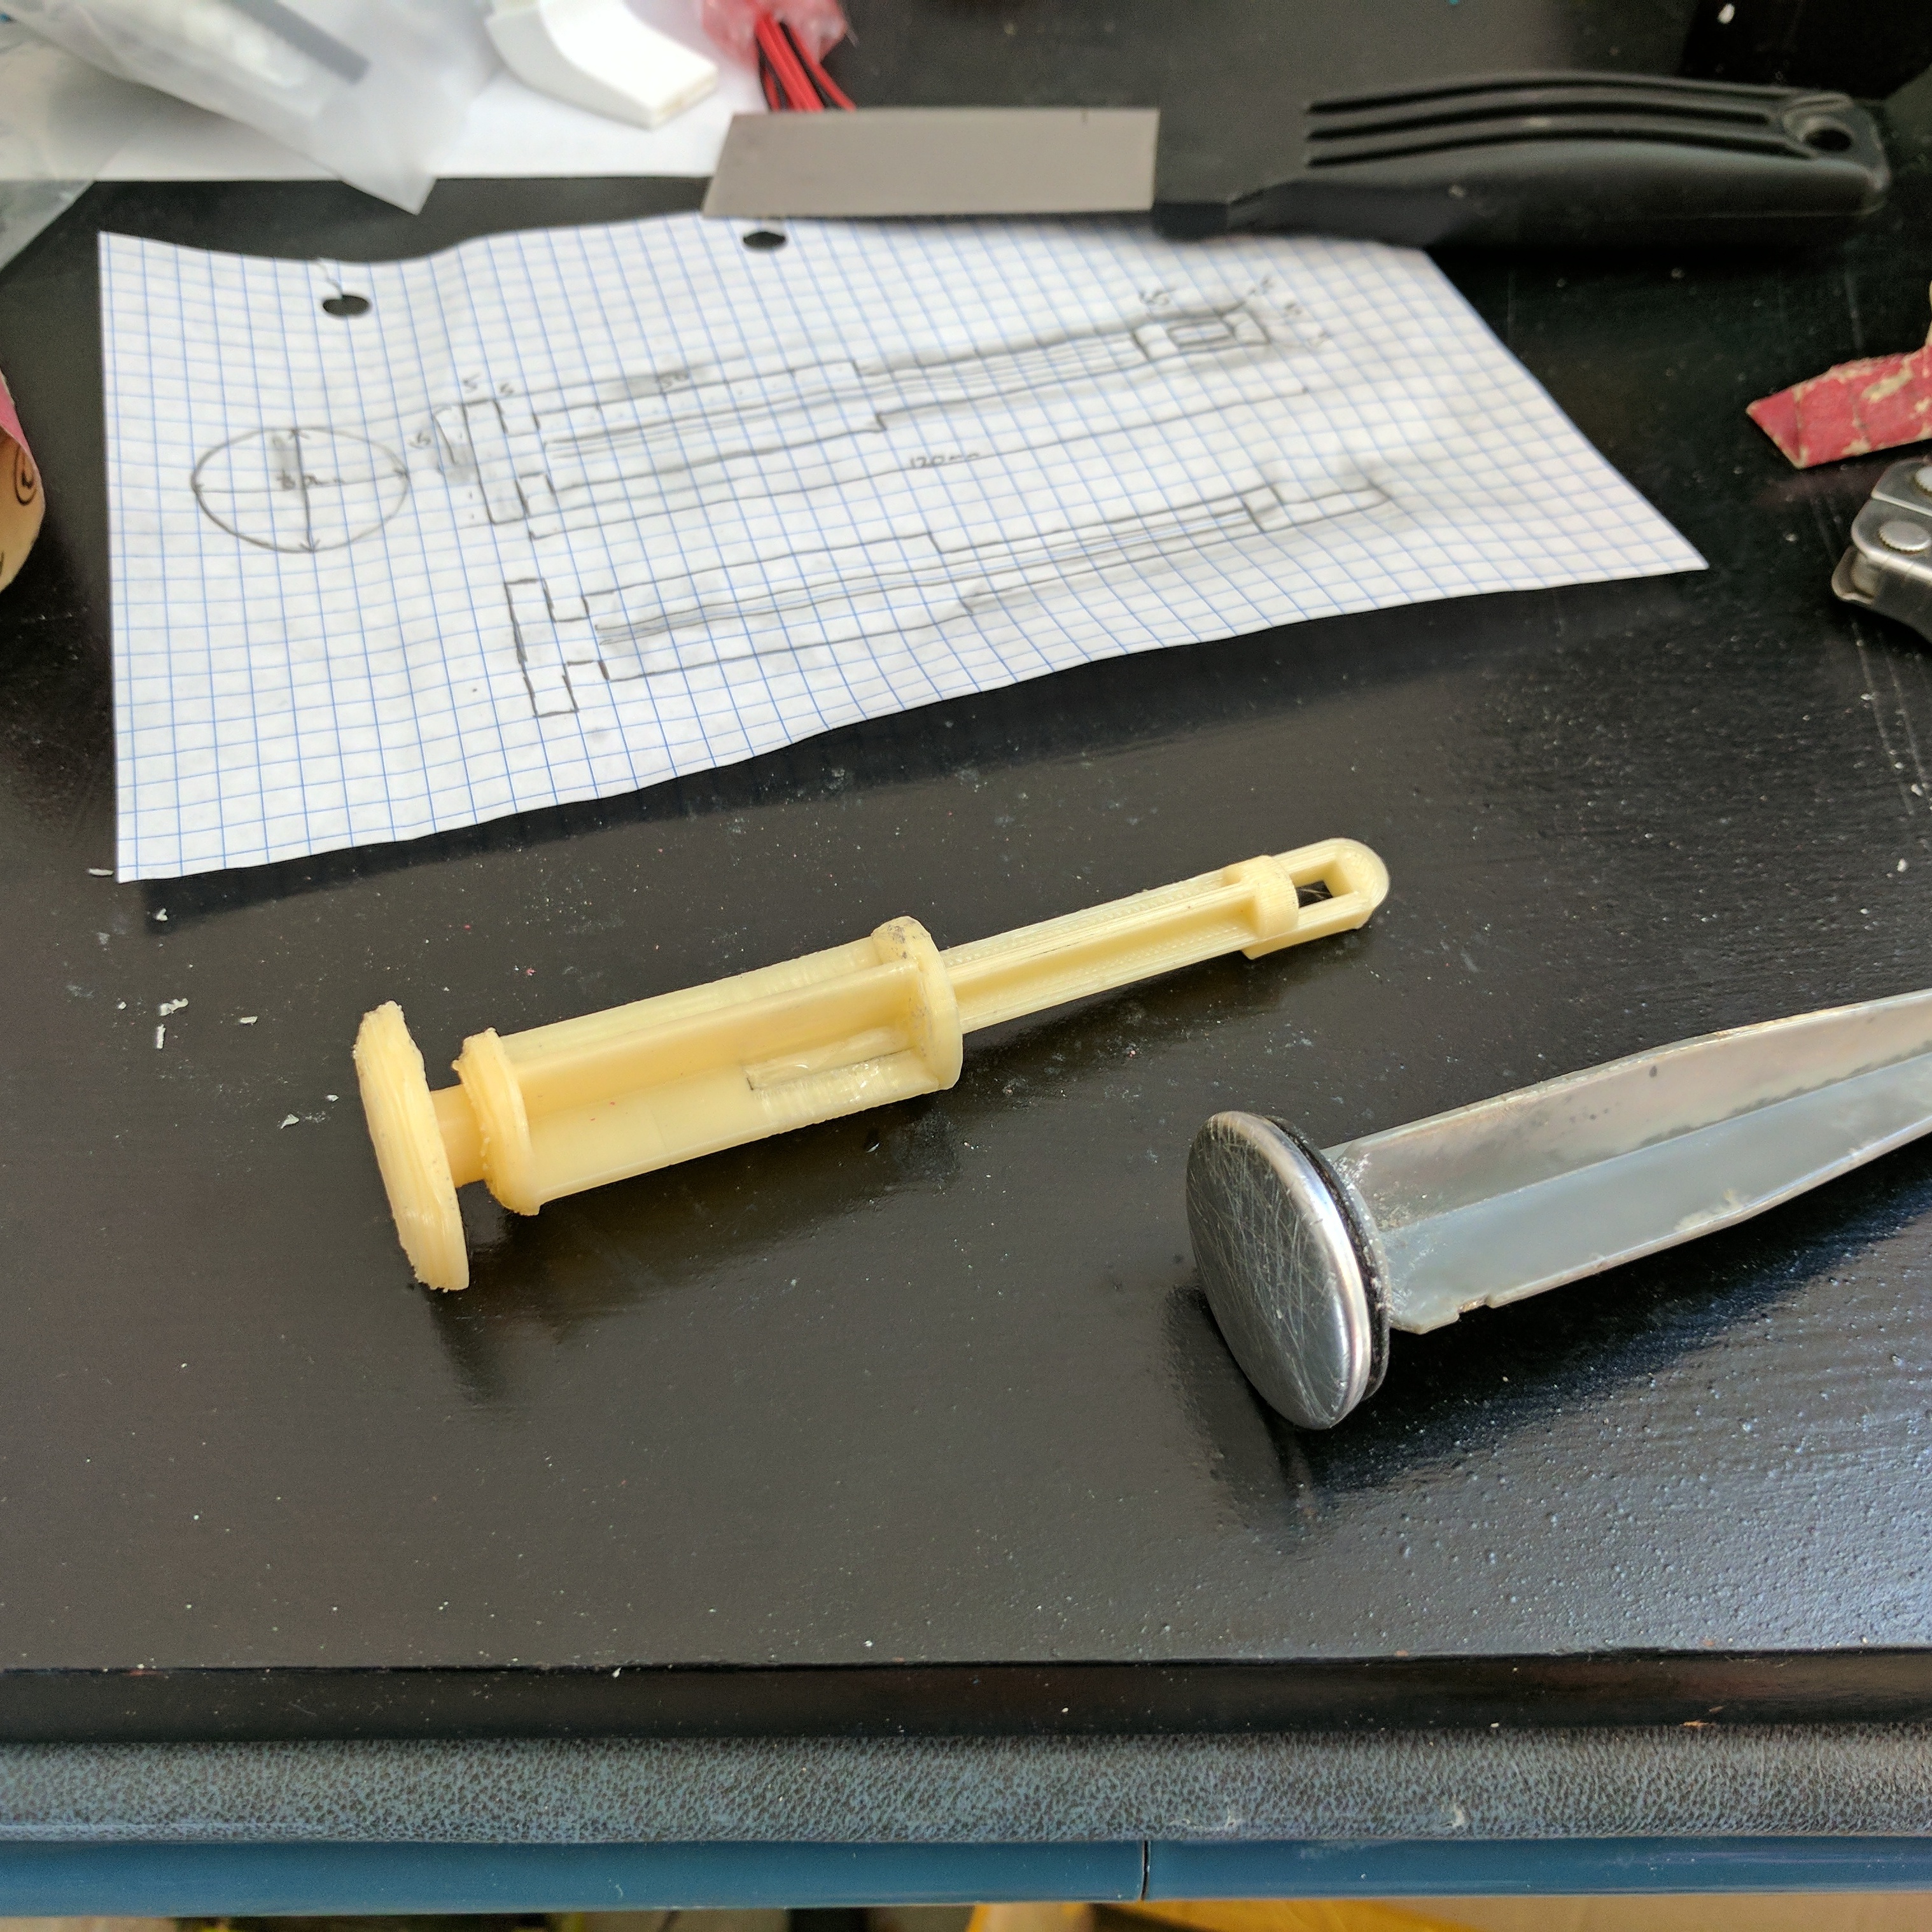
I did attempt some post-print finishing with spray paint but in the end (after a few hours of going in circles) scraped it.

Finished Product!

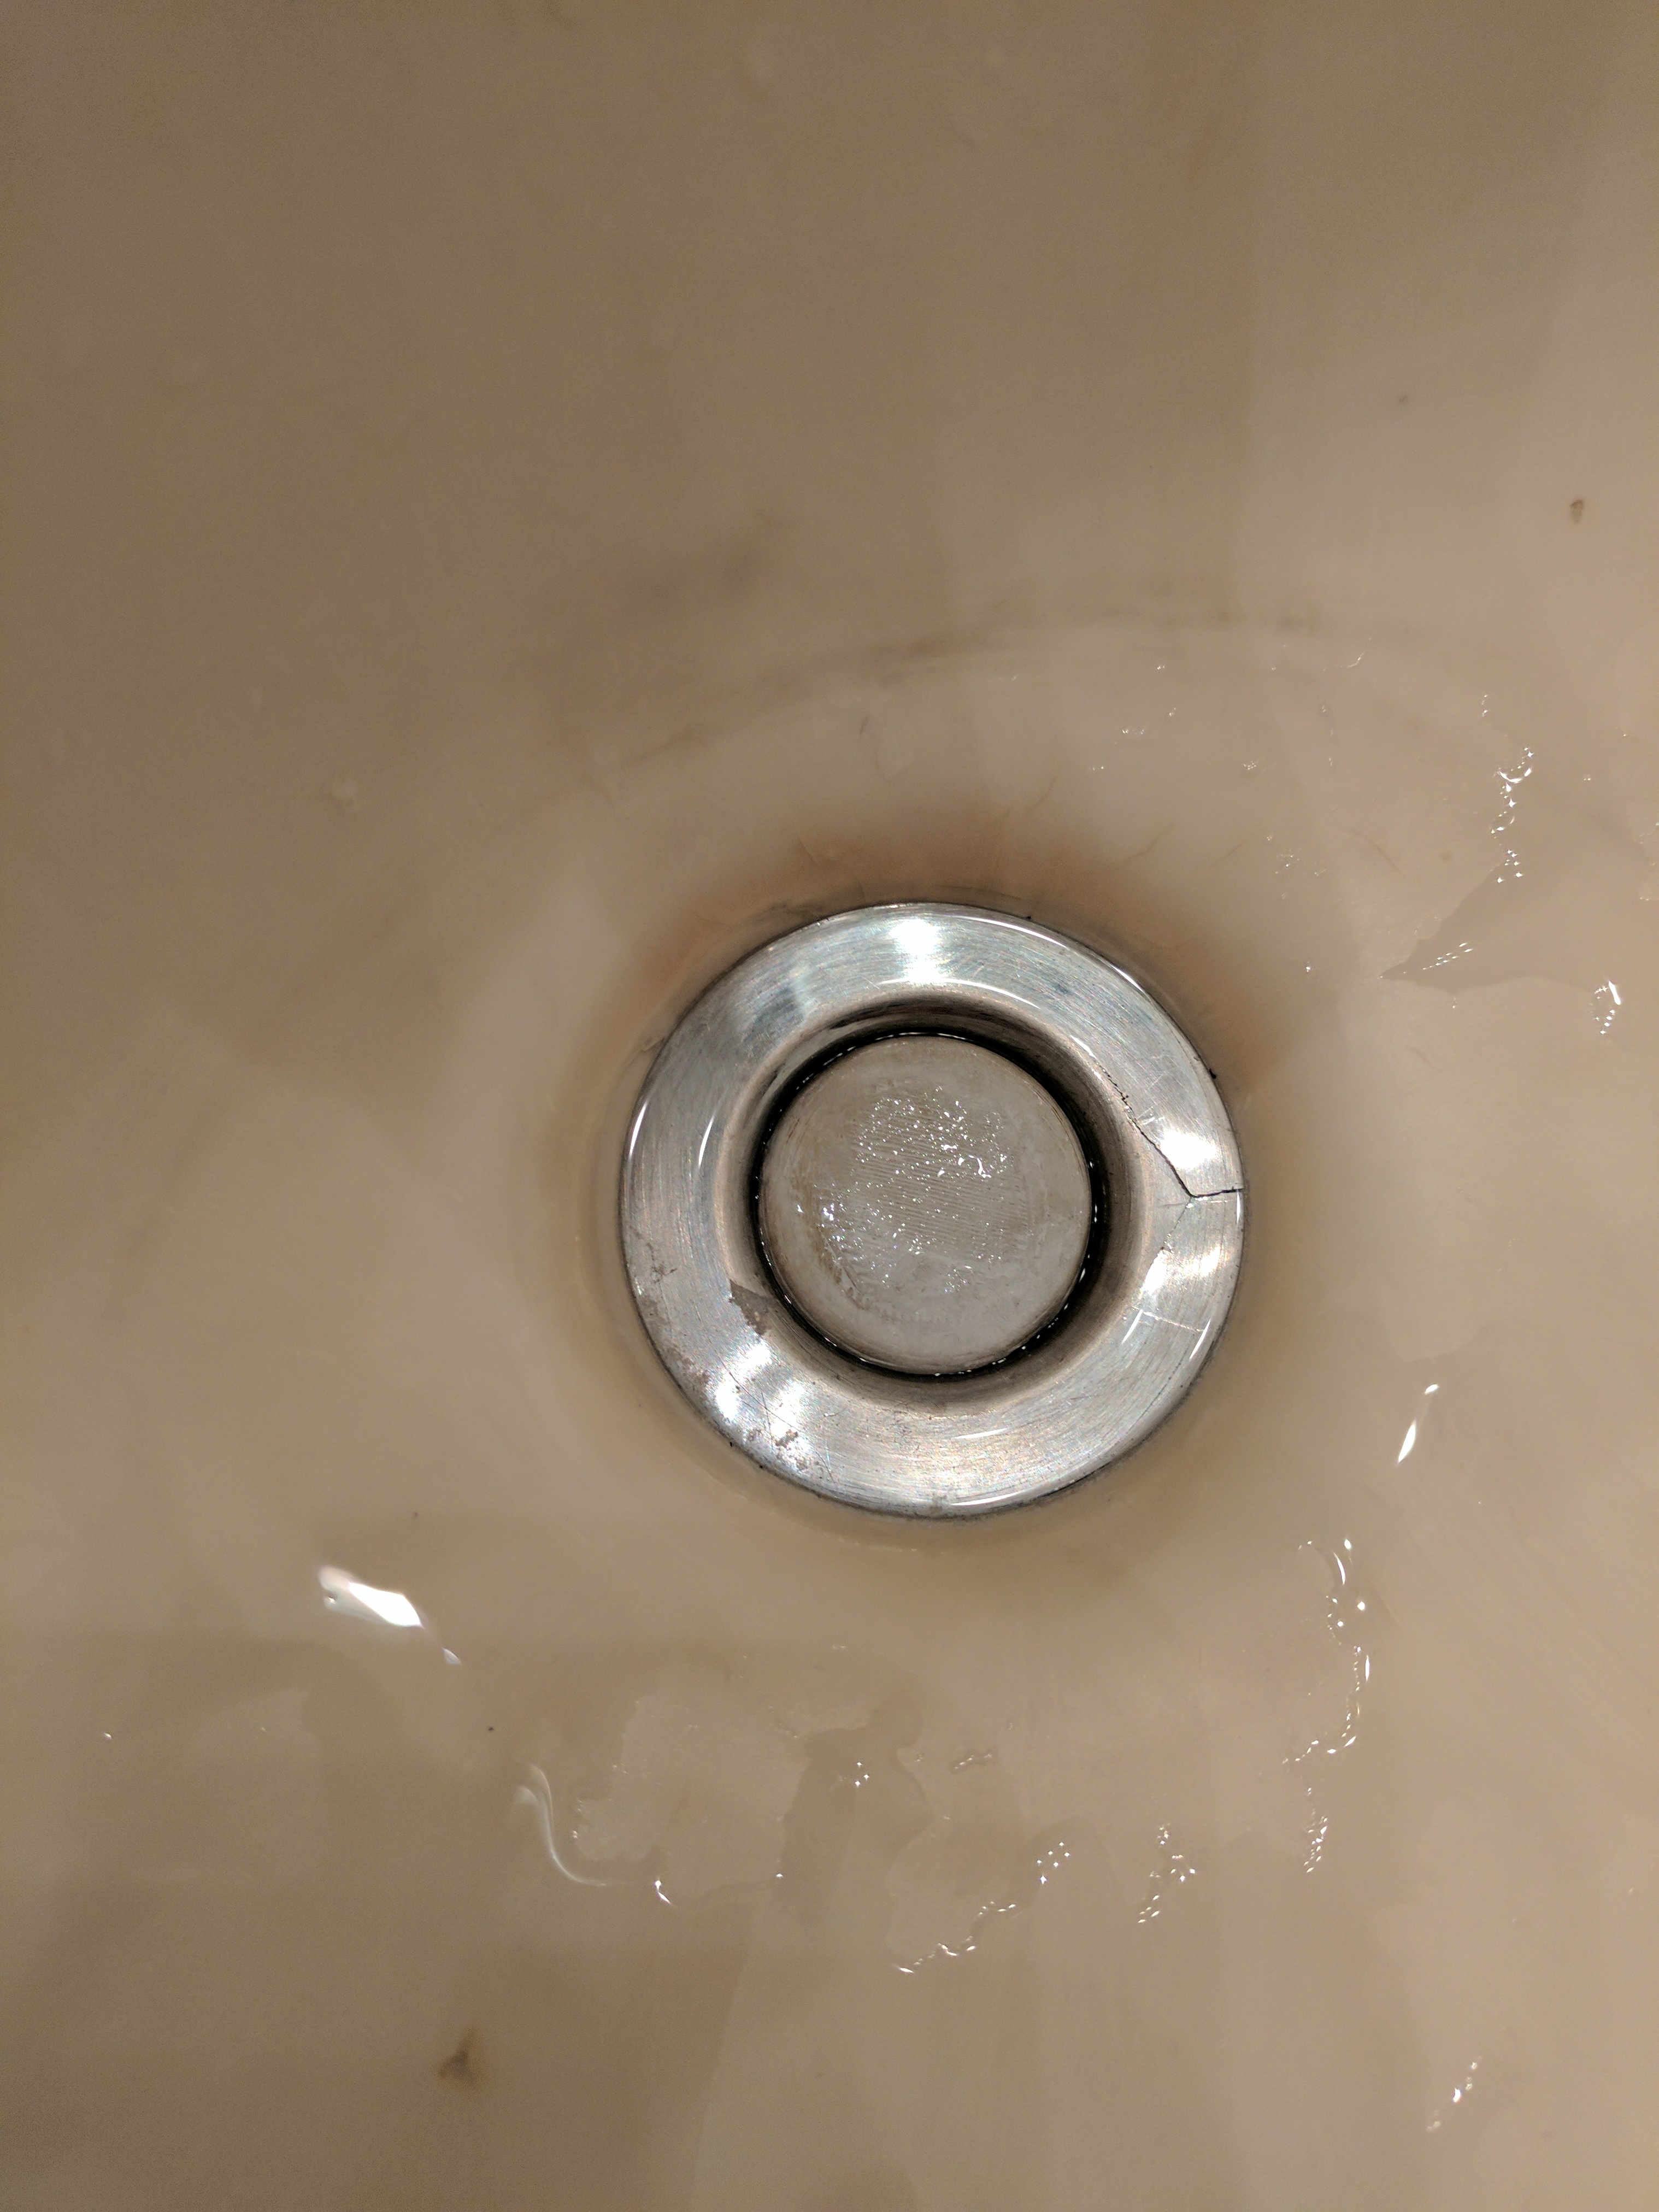
What a beautiful sight; and…IT WORKS!!

This is just so amazing. To think something up and design what you need. To create right before your eyes. And even better is when it is a useful print that brings along a benefit in some way. I love the trinkety things I have and will still print, but this was such a satisfying undertaking and I am just amazing that such technology exists and is available right at our fingertips!

Great Day!

We are PRINTING!!!

So I didn’t order any filament online ahead of time since I was hoping to get my first filament in person (if I could) to ask questions and try something out before jumping online into the game of finding not bad filament for a not bad price.  

Luckily 30 minutes away is I believe the only 3D Printing Store in the area. So this morning I made the pilgrimage northward with my amazing and supportive wife along for the ride. They had only one spool of PLA until they restock in a week, so I got myself a sweet roll of….Khaki PLA 😀 (but honestly nothing was gonna bring me down, it could have been neon glitter pink and I still would have been stoked to begin printing). I was able to grab a couple sample packs of blue and neon green which was nice.

After a few errands we got back and I calibrated and leveled the hotbed. Not bad at all. After loading in some blue filament came the moment of truth….

I WAS PRINTING!!!

I printed the demo chinese checker that came in the kit on the SD card.

It was a success!

So amazing!

The rest of the night was learning the basics of Cura and slicing software settings and then printing.

Another fun print tonight was for my little girl she saw the green filament sample and said she wanted a “Green Crocodile” so I found a moveable Crocodile Clip and got the going on the printer and….

[1hr Later]

Now there were some lessons learned today:

-Short cuts and cutting corners mostly means more work. Trying to cut print time by faster extrusion and larger layers lead to my first failed print. I also could have used some support in one section. Good learning experiences and that really is a big part of this journey. I’m excited with each step I’ve learned.

-Changing the filament can be a little tricky/finicky. Had a bit of a struggle with the first filament change and a couple of thumb blister to show for it. Now that I got my main spool in I won’t be changing it out anytime soon but may print a few upgrades to help that go smoother in the future.

-Maker sure your available filament will meet the demand on the print. I was gonna print a green “Benchy” boat but ran low I the print I tried to pause it and switch in the blue to save it but it didn’t take and so I have a 70% Benchy, but will do a reprint in Khaki tomorrow.

This is a lot of fun. I’m excited for the endless possibilities availabile. I’m also looking forward to designing a few custom cookie cutters with my family and getting them involved. I’m trying to find useful designs and ideas to print along with the fun and random ones. 😀

Great Day!

The Build: Day 3

It all came together today. The last bits of construction went pretty quickly and most of the time was focused on the wiring. I think the longest part was dealing with cable management but getting those black cable wraps on sure cleans everything up nice and pretty. 😀

Then came the moment of truth. 

I plugged it in and…

IT CAME TO LIFE! 

The only sound was the sweet hum of the small fan near the extruder. 

This was such an amazing build. I’ve never untaken something like this before and the journey has been just as exciting as the end result.

I now have a 3D printer!!!

I’m so excited to play with this! Getting some PLA filament tomorrow and then the fun begins!

What will be my first print?….STAY TUNED!

The Build: Day 2

Well after the Un-Taping, everything was ready this morning for the build. I started by following the pdf of written instructions included on the sd card but they only helped so much.

[BUILDING TIP] 

Pull up the Anet A8 build video from YouTube. When installing motors the pdf doesn’t specify the orientation which is important because of electrical connectors. It helps me to see it being built along side what I am doing.

This is my first big undertaking of a project like this (diy kit, electronics, 3d printing). I love being able to see all the parts that were once merely pieces in a box fit together and grow as a whole.

My favorite part of the build today after seeing the frame come together was installing the y-axis belt. This was the first “moving” part and after getting the heating bed the build is really taking shape.

[Quirks]

I did encountered a missing hole through the acrilic frame for one screw. Luckily I previously had bought a small drill set and since both sides are mirrors of one another I drilled a hole myself. Also in placing the T frame bars I needed to make the holes a smidge larger in the plastic to get the rods to pass through. 

Also there are so many small nuts and screws that are sometimes.es hard to place with my fatty fingers. 😀

All in all things are coming together nicely. I do have a time lapse I’m trying to do with the build so we will see if that turns out. And hopefully tomorrow (if time permits) I should be close to having a completed (and functional) 3D Printer!

The Build: Day 1

It came!

We just returned from vacation and what was waiting on the doorstep​? 

Well it kinda looks like Christmas in June 🎄 but there it is…the Anet A8 kit. My First 3D Printer!

I’m excited to experience this rite of passage and to learn through building. 

Now after the Unboxing came the UnTaping… 

[2hrs later]

[BUILDING TIP] A set of tweezers made things go quicker by being able to help lift the tape from the corners for peeling. 

The end result kinda looked like a pile wood shavings, but it’s all there and now ready to be assembled.

And so it begins!

Dr3dDad LARGE Icon

Hello and Welcome! I’m Eric. I just recently graduated from Medical School and will be jumping into a Family Medicine residency program in July.  I have a wonderful family, with an amazing wife and 2 great kids. I love the medical field and I love technology.

I have been considering doing something like this for sometime now and though I know I am a bit delusional thinking I will have anytime during residency I have always been told it is important to continue your hobbies and interests even during this difficult and intense time of training.

So here I go. I am starting at the beginning – [LEVEL 0]. My first 3D printer an ANET A8 DIY kit is on its way. I feel this is the best way to jump in.

My goals are to learn and to have fun. I hope to share my love of anatomy and medical sciences as well as print fun, random, and interesting things.

I hope that the Dr3dDad channels will help inspire others and I am excited to join this amazing community.

Huzzah!